
Getting Started with the Vodia IOP: Part 3
The third part of our Vodia IOP series will transition into features including recording, user voicemail, cell phone configuration, and more. If you are just beginning to set up your IOP device, visit Part 1 and Part 2 of our series prior to segueing into the setup of these features.
If you are new to Vodia and the IOP device, the Vodia IOP is a compact, feature-loaded all-in-one SOHO PBX. The device is prebuilt and ready to deploy with a four concurrent call license. Looking for more calls? The device has the ability to license up to 16 concurrent calls.
Setting Up the Device, Cont.
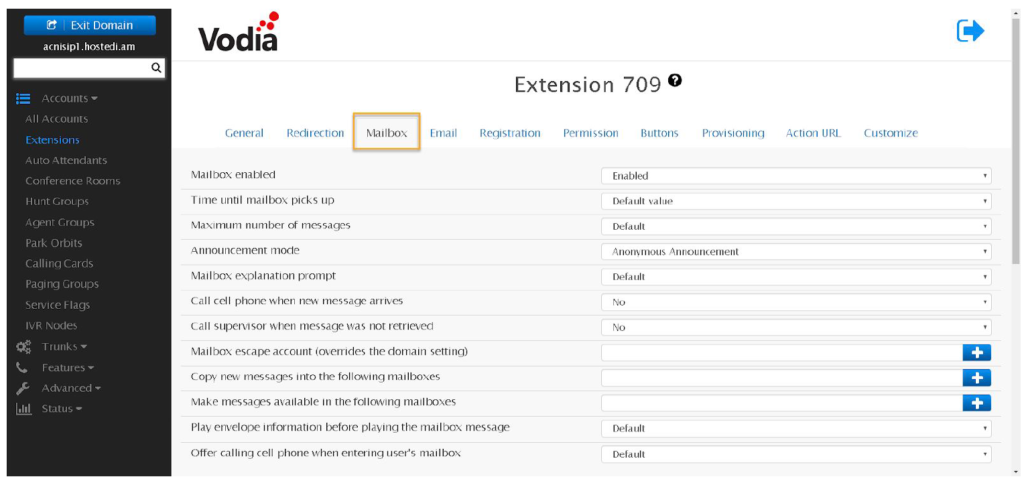
User Voicemail: One of the frequently used features of the Vodia IOP is the user mailbox. It contains an extensive range of features, which are highlighted below:
- Mailbox Enabled: Admins can enable or disable an extension’s voice mailbox.
- Time Until Mailbox Picks Up: Admins can specify how long the system will wait until a call is redirected to a user’s voicemail.
- Maximum Number of Messages: Admins can specify the max number of voicemail messages that can be stored at one time. Once the maximum has been reached, a saved message will be deleted every time a new caller wants to leave a message. If there is no space available, the caller will be informed that the mailbox is indeed full.
- Announcement Mode: There are three different announcement options, which include – anonymous announcement (only hearing the extension number), name announcement (only hearing a recorded name), or personal announcement (hearing a pre-recorded greeting message).
- Call Cell Phone When Message Arrives: A user can opt to not have calls forwarded to their mobile device; however, they may still want to receive alerts when a new message arrives on their extension. This feature can then be activated.
- Mailbox Escape Account: Change the direction that a call takes once the caller presses 0 to speak with an operator. The extension entered into this setting will receive any calls that are supposed to be directed to the operator.
- Copy New Messages into the Following Mailboxes: Group mailboxes can easily be created and are great for boss/admin mailboxes, after-hours calls, or holiday calls. All parties will be notified of an incoming message by the MWI located on their individual phone.
- Make Message Available in the Following Mailboxes: This is another setting used to establish group mailboxes. When someone deletes a message or marks it as read, everyones message will be deleted or marked as read. This is ideal when messages require a one-time response, such as when a customer calls into a group & wants someone to call them back.
- Play Envelope Information Before Playing the Mailbox Message: Users can listen to the details of every voicemail message before hearing the actual message – such as time or caller extension number. This setting on the extension will override the one on the Domain level (Domain > Features > Voicemail).
- Offer Calling Cell Phone When Entering User’s Mailbox: A user can be notified to their cell whenever a new voicemail message arrives.
Configuring Your Cell Phone: Begin by navigation to “Extension” and choosing an extension account. Click on the “Redirection Tab.” Under the field for cell phone number, enter the user’s cell phone. Under “Offer Special Menu When Call is Answered on Cell Phone,” drop down and click Yes. The Vodia IOP will play an audible beep to the user whenever they answer a call redirected to their cell phone. The user will then be able to choose one of the following audio prompts:
- Press 1 to connect
- Press 2 to reject (which will reject the call, play a busy announcement, and sent the caller to voicemail)
- Press 3 to send directly to voicemail
- Press 4 to redirect the call
- Press 5 to park the call
- Press 6 to send the call to the callback list
The Vodia IOP can also play a message whenever the user calls into the PBX (Virtual Private Assistance). To activate this feature, go to the section “When the Cell Phone Call the PBX” and choose “Offer Personal Virtual Assistance.” When the cell phone calls into the system, the IOP will then play an audible message to the user: place outbound call, receive a call back, go to the mailbox, or go to the auto attendant.
Find Me Follow Me: The Vodia IOP can call the extension cell phone whenever the desktop phone rings. The admin will need to turn on the following settings to activate this. When calling the extension directly, choose “immediately.” The PBX will call the cell phone and desktop phone. If the extension is part of a hunt group or an agent group on the system, the IOP can call the user’s cell phone. Activate this setting by choosing “include cell phone in the group.”
Hunt Group Setup: Hunt groups are sets of extension numbers that are embedded inside a single virtual extension. Incoming calls will be rotated through the pool of extensions until someone answers and the caller is connected.

Create a hunt group by navigating to “All Accounts” in the domain level. Choose “Hunt Groups” and then click the add button. You will be presented with a dialog box prompting you to give the group an account and display name. When the admin navigates to the newly created hunt group account, an extension can be assigned to each of the stages. Admins can also program how many seconds a stage should ring before moving onto the next. The final stage can be used to send the call to a general voicemail or an outside line.
Auto Attendant: Functioning like a virtual receptionist, the Auto Attendant will connect incoming calls to extensions and other devices that have been configured in the system. Auto Attendant will announce a company’s name followed by a selection of dialing options. To create an Auto Attendant, navigate to “All Accounts” in the domain level and choose “Auto Attendant.” Simply click add. You will be presented with a dialog box that will ask you to give Auto Attendant an account and display name.
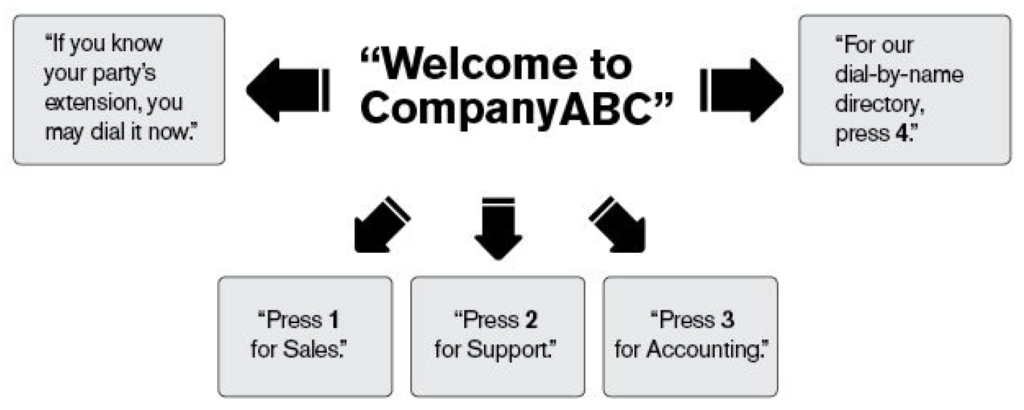
The greeting of the Auto Attendant should be carefully crafted, as it is the first greeting your customers hear when they call into the system.
- To record a greeting, click “behavior” under the auto attendant menu. Add the extension(s) that will be recording the greeting. Navigate to the IVR tab (located at the top of the page). Under “Override for Default,” the user will be instructed to dial *98 and the account number of the auto attendant. When the user dials this star code plus the account number, the Vodia IOP will play the following message “Please Record a Message at the Tone.”
- Direct inbound callers with a set of instructions based upon the recorded greeting. Under “Direct Destination,” add the input number that the user will dial to reach an agent on the system. Under “Destination,” add the extension that will be reached.
Service Flags: Service flags will control business hours of the system. Create a service flag on your system by navigating to accounts in the domain level. Click on “Service Flags” > “Add,” which will prompt a dialog box. Assign an account number and display name and click create.
When you navigate to your newly created service flag, you can configure the company’s business hours. The flag can either be automatic or manual.
- Manual Mode: Users can dial the service flag to activate or deactivate the account. It can also be configured as a button line key on the phone.
- Automatic Mode: Useful when setting business hours accordingly from Monday – Friday.
Once you have configured your business hours, assign the service to the following accounts on your Vodia IOP system: Auto Attendant, Hunt Groups, Agent Groups. Under the Service Flag, click on the plus icon to add a service account. You can also assign an extension, general mailbox, or outside number. Additionally, it can simply be nested to another Auto Attendant to alert customers of other options.
Now that you’ve made it through the Vodia IOP guide, it is time to get connected to learn about all of the other services and products Vodia offers. Contact the 888VoIP team at [email protected] or 888-864-7786 for more information.