
How to Create VLANs with GWN7800 Series Switches
As technology advances, the networks in offices, hotels, educational institutions, and various other sectors have become increasingly intricate. A single Local Area Network (LAN) often supports phones, computers, IoT devices, smart technologies, and more, all operating simultaneously. This complexity can create challenges in terms of security, network organization, and scalability. As a result of these roadblocks, Virtual Local Area Networks (VLANs) have become an increasingly popular feature that can help partition physical networks into virtually manageable ones. Within this blog post, we’ll introduce you to building VLANs with Grandstream’s GWN layer 2+ switches.
Getting Started with GWN7800 VLAN Setup
A VLAN creates a group of host devices that can communicate as if they were on the same broadcast domain, regardless of their physical location. This virtual grouping allows for better network management and organization. To set up VLANs on Grandstream’s GWN7800 series switches, access the WebGUI via the device’s IP address or through Grandstream’s GWN.Cloud or GWN Manager platforms.
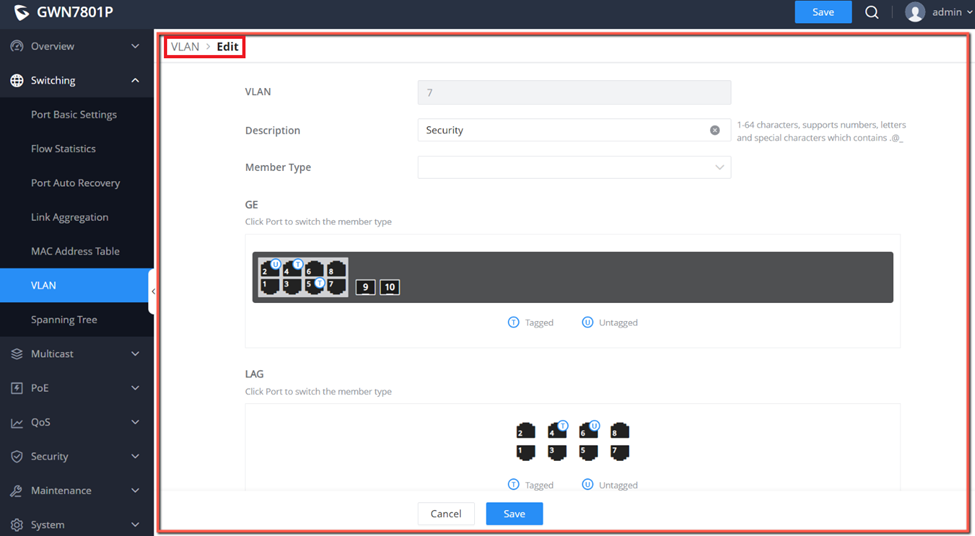
After accessing the GWN7800 switch GUI, navigate to the “VLAN” submenu under the “Switching” menu. Click “add” to define the VLAN ID, which can be set as a range or individually. Once you create the ID, configure the following settings:
- Description: A brief comment for the VLAN that can be viewed with the VLAN list
- Member Type: Choose between removing all ports GE/LAG from the VLAN, tag all ports GE/LAG to the VLAN, or untag all powers GE/LAG from the VLAN
- GE: Choose which individual ports are tagged, untagged, or selected
- LAG: Select individually which LAGs are tagged, untagged, or unselected
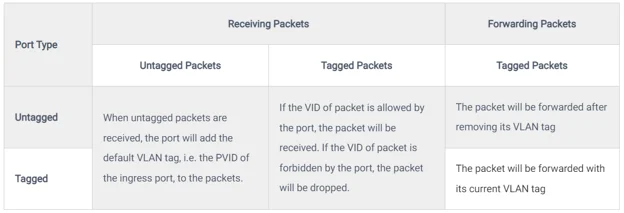
Include a tagged trunk port in every VLAN selection. Group devices based on type, department, or other strategies. If a device moves to a new port, you can easily update the settings. For more details on Tagged vs. Untagged Ports, refer to the table below.
Configuring VLAN Port Settings and Members
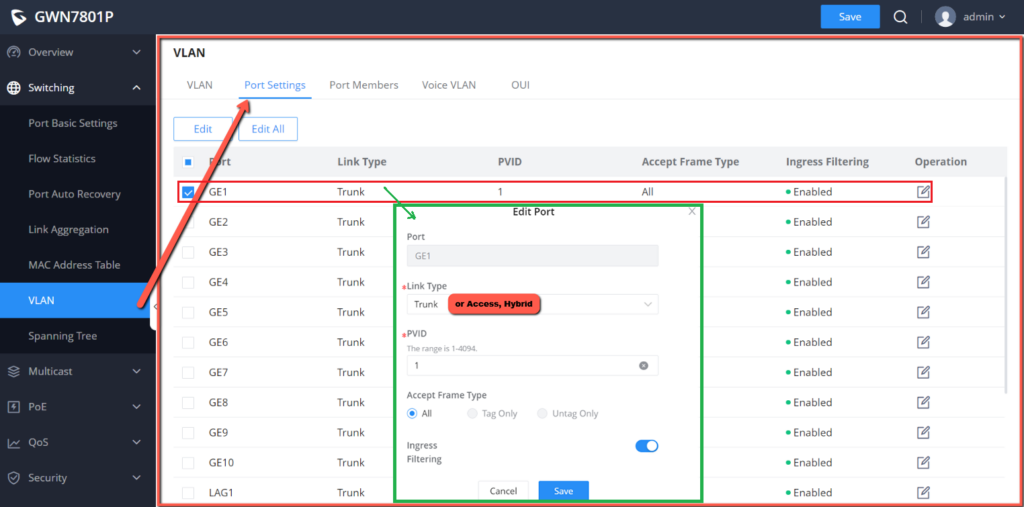
With the VLAN created, start configuring the port settings. The port settings tab in the VLAN submenu lets you set up VLANs on each port and LAG by specifying the Link Type (Trunk, Access, Hybrid) and the default VLAN or PVID. You can also enable Ingress Filtering and select the accepted Frame Type for each port. Make adjustments in bulk or individually via the “Operation” setting.
From the Port Members tab, view and adjust the Tagged and Untagged VLANs for each port. Enter these as a range or individually. Properly associating ports and LAGs with their corresponding VLANs ensures that broadcast and multicast traffic is segmented, improving performance and reducing network congestion. Remember to configure VLANs at the router level for inter-VLAN routing.
Voice VLAN Configuration and OUI
Voice VLANs are an optional configuration for voice data streams on the GWN7800 series switches. This feature is particularly useful when deploying a complete Grandstream solution with GWN switches, IP phones, and UCM IP PBX. By setting up Voice VLANs and adding ports with voice devices, you can perform QoS-related configurations to prioritize voice data transmission. This step follows VLAN and port settings configuration. Afterward, activate the Voice VLAN function and select the VLANs that will use this feature.
The GWN7800 series also supports Organizationally Unique Identifier (OUI) capabilities. An OUI address is a unique identifier assigned by the IEEE to a device vendor, enabling network administrators to identify device brands on the network, which is especially beneficial for large deployments.
To learn more about the GWN7800 series and how it can benefit your network, contact 888VoIP. Our team is ready to assist with any questions you have and provide further guidance on creating and managing VLANs with Grandstream’s GWN switches. Let us help you enhance your network’s performance and security.
