Step-by-Step Guide to Configuring Site-to-Site VPNs on GWN Routers
Managing a business with multiple offices across different cities can be overwhelming, especially when it comes to securely connecting all locations to your central headquarters. The need to seamlessly share resources and data without compromising security is a common challenge. This is where Virtual Private Networks (VPNs) prove invaluable, creating secure, encrypted paths for your communications. Grandstream’s GWN routers are the architects of these digital bridges, ensuring that your data travels safely across the network, whether you’re connecting branch offices, remote workers, or departments within the same building. In this post, we’ll explore the types of VPNs you can configure with Grandstream’s GWN routers and how they can enhance your network’s security and connectivity.

GWN Router VPN Overview
A Virtual Private Network (VPN) is used to create an encrypted connection enabling users to exchange data across shared or public networks acting as clients connected to a private network. The benefit of using a VPN is to ensure the appropriate level of security for connected systems when the underlying network infrastructure alone cannot provide it. The most common types of VPNs are remote-access VPNs and site-to-site VPNs. VPNs can be defined between specific endpoints such as IP-Phones and computers, and servers in separate data centers when security requirements for their exchanges exceed what the enterprise network can deliver.
Increasingly, enterprises use VPNs to secure data and voice exchange. Grandstream GWN7800 Routers support several VPN types, enabling installers to create encrypted and tunneled connections across shared or public networks, and allowing users to exchange data securely. These VPN types are:
- OpenVPN: Client/Server
- IPSec: Client/Server
- L2TP: Client
- PPTP: Client
- WireGuard
These VPNs prevent unauthorized users from accessing the network, prevent eavesdropping on network traffic, and maintain the integrity of data as it traverses the VPN tunnel. Authentication methods vary but often involve passwords, digital certificates, or a combination of both, ensuring a high level of security.
Configuring a Site-to-Site VPN With OpenVPN®
OpenVPN® is a VPN system that offers an open-source Community Edition (CE), and is one of the most popular VPN solutions. It supports both site-to-site or point-to-point connections in routed or bridged configuration and for remote access use cases. Implementing this solution can be done on both client and server applications. In this example, a client has several branch offices that are connected to the Internet using Grandstream GWN7000 series routers. The client would like to establish an encrypted VPN tunnel between the main office location and another branch so it may securely access server assets on the main office network. Setting up this tunnel will additionally allow VoIP calls to go through the VPN tunnel to prevent potential rogue eavesdropping between the two sites.
Network Configuration:
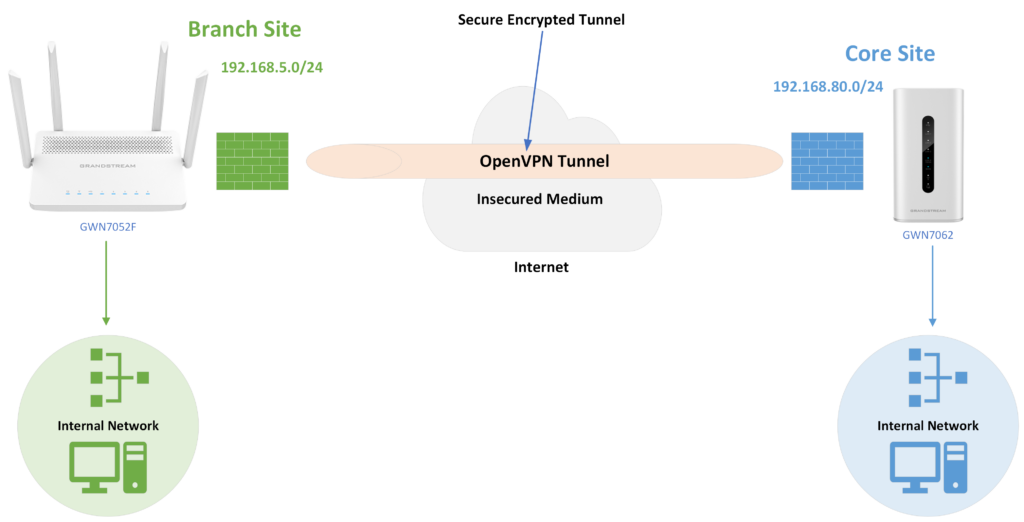
- The Core Site has a LAN subnet with a range of: 192.168.80.0/24 (OpenVPN® Server)
- The Branch Site has a LAN Subset with a range of: 192.168.5.0/24 (OpenVPN® Client)
- The VPN tunnel will have the following IP range: 10.0.10.0/24
The figure below shows the actual diagram of the network:

Creating a Certificate of Authority and Client/Server Certificates
- Before configuring the OpenVPN® Client/Server, a Certificate Authority (CA) and Server Certificate must be generated, and users added with a Client Certificate.
- A Certificate Authority (CA) is a trusted entity that issues electronic documents that verify a digital entity’s identity on the Internet. Electronic documents (a.k.a. Digital Certificates) are an essential part of secure communication and play an important part in the public key infrastructure (PKI)
- Certificates can be created under the GWN router’s GUI or through GWN.Cloud/Manager, found under the Systems tab > Certificate Management > Certificate. Certificate customization can be fully configured under this setting menu.
- With a Certificate Authority created, the next step is to generate the Server and Client certificates, which can be done within the GUI of the GWN router device or through GWN.Cloud/Manager. This will be assigned to both the server and the client so an encrypted tunnel between the two can be verified.
- For further information on customizing a Certificate of Authority and Client/Server certificates, take a look at our technical documentation here.
Creating and Linking an OpenVPN® Server
Once Client and Server certificates have been successfully generated, they are now ready to be assigned and used by the OpenVPN® Server. To create a VPN server, navigate to VPN > VPN Server, OpenVPN® Server. Server settings such as the type, name, status, protocol, TLS settings, and more can be configured from this menu option. The server’s Authentication Modes can be accessed within this menu as well, choosing between:
- SSL: Authentication made using certificates only, with no username/password authentication required. This allows for each user to have a unique client configuration that includes their personal certificate and key, which was made earlier. This is typically chosen to provide users with seamless VPN access, however, can be less secure as it does not require the additional security layer of a username and password.
- User Authentication: With this option, authentication is made using only the Certificate Authority and username and password, meaning no certificates. This setting is useful when creating individual certificates for every user would be an unneeded step, and users can share a TLS key and have their own usernames/passwords.
- SSL + User Authentication: This type of authentication requires both a certificate and username/password. Each user has a unique client configuration, username, and password.
- PSK: This authentication is used to establish a point-to-point OpenVPN® configuration. A VPN tunnel will be created with a server endpoint of a specified IP and a client endpoint of a specified IP. Encrypted communication between client and server will occur over UDP port 1194, which is the default OpenVPN® port. This method is incredibly secure, as there are multiple factors of authentication, TLS Key, Certificate, and username and password.
The final step in server creation is to allow it on the desired network grounds. This is done by editing created VLANs and setting the new server as a desired Destination. With this finish, the OpenVPN® client can be configured on the GWN router at any branch site that needs to be connected to the central site. This can be done through the router’s GUI or through GWN.Cloud/Manager through the VPN > VPN Clients menu option. The same as the OpenVPN® Server, make sure to allow OpenVPN® Client on the desired network groups.
Configuring a L2TP Client VPN Layer 2 Tunneling Protocol (L2TP) is a tunneling protocol used to support virtual private networks (VPNs) or as part of the delivery of services by ISPs. It does not provide any encryption or confidentiality by itself. Rather, it relies on an encryption protocol that it passes within the tunnel to provide privacy. L2TP deployments are typically deployed alongside other technologies, such as IPSec, to provide encryption and authentication capabilities. L2TP is most frequently deployed as a remote-access VPN, providing remote users who are working from a home office or traveling with access to a centralized network. L2TP configuration on a GWN router is fairly straightforward, requiring the server information, username, and password of the VPN Server configuration when adding the VPN client.

Configuring a PPTP VPN
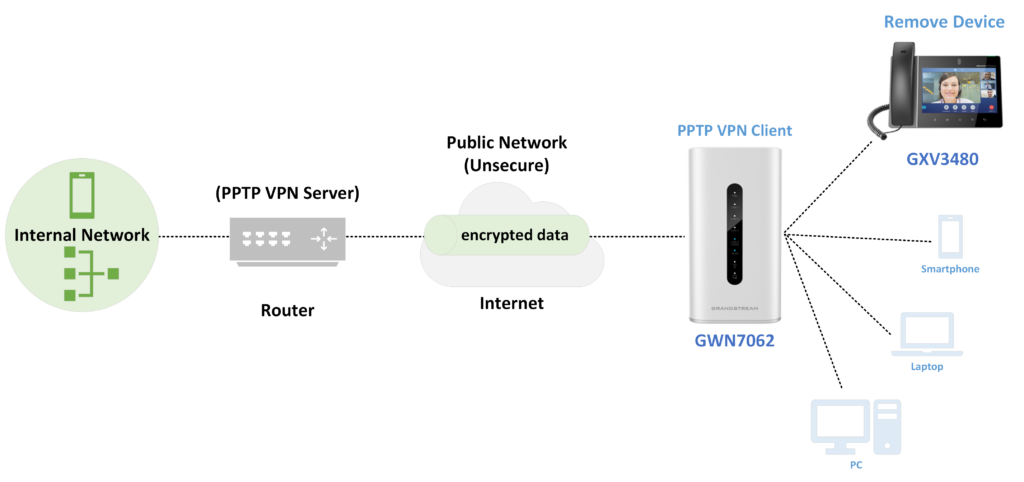
PPTP is a data-link layer protocol for wide area networks (WANs) based on the Point-to-Point Protocol (PPP) and developed by Microsoft that enables network traffic to be encapsulated and routed over an unsecured public network such as the Internet. Point-to-Point Tunneling Protocol (PPTP) allows the creation of virtual private networks (VPNs), which tunnel TCP/IP traffic through the Internet. GWN70xx routers support PPTP Client VPN, the created VPN can be associated with a VLAN thus all the devices connected to the router will use the VPN tunnel. Please refer to the figure below.

The first step to creating the PPTP VPN is to create and configure the PPTP server parameters. It is important to note that the PPTP Server address needs to be the same as on our PPTP Client. Other settings such as PPE, forwarding between sites, traffic routing policies, and other parameters can be edited from the GWN routers GUI or GWN.Cloud/Manager. Once server setup is completed, PPTP user credentials must be created in order to allow them to connect to the PPTP server. PPTP user creation is a straightforward process, only requiring the full name of the user, a related username, and a password. These will be used for configuring the PPTP Client in the following step.
With PPTP Users created, the next step is to begin configuring the clients, which can be done in the VPN Clients submenu of the GWN router. When creating a new VPN client, the username and password that were set previously in the PPTP user creation set must be input here. Finally, the PPTP Client VPN must be enabled on the desired VLANs.
Please contact our helpdesk if you have any further questions or need assistance.


