How to Factory Reset Yealink, Cisco, Polycom, Grandstream, 2N, & Patton VoIP devices
A common practice when troubleshooting and provisioning IP devices connected to VoIP Phone Systems is the factory reset, or a full restoration of an electronic device to its factory settings. People who factory reset phones include value added resellers, service providers, technicians, support staff, and even end users.
It is important to understand that while factory resetting a device is a great backup plan if a device is not working properly or if you want to follow a guide online and need to quickly get to the same starting point as the author, all of the localized settings on the device are lost when you factory reset. While 3CX and other capable phone systems can reconfigure your devices with auto provisioning or configuration files that can be easily reapplied to the device, it is important to remember to do so.
Factory Reset Yealink T20P, T22P, T26P, T28P, T32G, and T38G
Hold down the OK button for ten seconds, then hit OK again to confirm the reset. Alternatively, you can factory reset the phone with the Advanced Settings in the phone’s menu.
Factory Reset Yealink VP530
On the touch screen, navigate to Advanced options. The default password is admin. Select Reset&Reboot, which will open the factory reset menu. You can choose to Reset All, Reset Configuration, or Reset Userdata. Press the button next to Reset Now and press OK to confirm the reset.
Factory Reset Yealink W52P
Log in to the web interface of the DECT base. Navigate to Phone > Upgrade and select “Reset to Factory.”
Factory Reset Cisco 303, 502G, 504G, 508G, 509G, and 525G2
In the phone menu, select Option 14 to factory reset the phone, then hit OK to confirm the reset.
Factory Reset Polycom IP 301, 501, 550, 601, 650, and 670
Press and hold 4, 6, 8, and *. Enter the admin password to proceed with the factory reset. The password is 456 by default.
Factory Reset Polycom IP 320, 321, 330, 331, 335, 430, 450, 560, and 7000
Press and hold 1, 3, 5, and 7. Enter the admin password to proceed with the factory reset. The password is 456 by default.
Factory Reset Polycom IP 4000, 5000, and 6000
Press and hold 6, 8, and *. Enter the admin password to proceed with the factory reset. The password is 456 by default.
Factory Reset Polycom VVX 1500
Press and hold 2, 4, and 6. Enter the admin password to proceed with the factory reset. The password is 456 by default.
Factory Reset Grandstream GXP 2000, 2010, and 2020
In the phone, navigate to Menu > Config > Factory Reset. Enter the MAC address of the phone and press OK to proceed with the factory reset.
Factory Reset Grandstream GXP 2100, 2110, 2120, 2124, 1405, 1400, and 1450
In the phone, navigate to Menu > Config > Factory Reset. Press OK to proceed with the factory reset.
Factory Reset 2N Helios IP Uni
Remove the front panel of the Uni to access the reset button in the bottom right corner. Push and hold the Reset button for 10 seconds to factory reset the device. A quick tap of the Reset button will restart the device without changing its configuration.
Factory Reset 2N Helios IP Force and Safety
The Force and Safety each have X6 configuration jumpers located in the upper right-hand corner of the PCB that can be used to factory reset the unit.
- Disconnect the device from the power supply.
- Move the short-circuit jumper on the X6 connector straight across the bottom two pins.
- Reconnect the power supply and wait for the tone.
- Disconnect the power supply.
- Move the short-circuit jumper on the X6 connector back to the top-left and middle-left pins.
- Reconnect the power supply. The device will be reset to factory defaults.
Factory Reset 2N Helios IP Vario
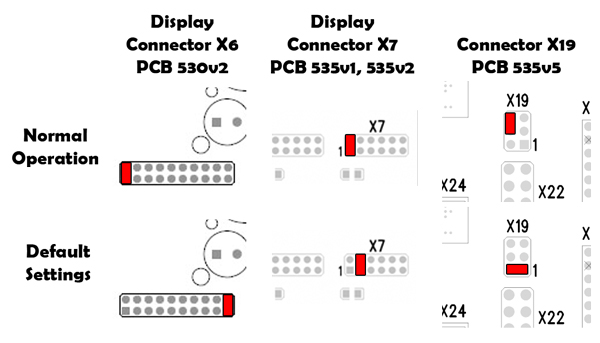
The Vario has X6, X7, or X19 configuration jumpers that can be used to factory reset the unit depending on the PCB version. Refer to the image after the instructions for which resetting pins to use with your model.
- Disconnect the device from the power supply.
- Connect the jumper into the resetting (default setting) position, and put the display switch into the F_RES position in the display-equipped models with 535v1 and 535v2 board versions.
- Reconnect the power supply and wait for the tone.
- Disconnect the power supply.
- Remove the jumper from the resetting (default setting) position, and put the display switch into the NORMAL position in the display-equipped models with 535v1 and 535v2 board versions.
- Reconnect the power supply. The device will be reset to factory defaults.

Factory Reset CyberData IP Intercom with Keypad, IP Indoor Intercom, IP Outdoor Intercom, and IP Emergency Intercom
- Unplug the intercom.
- Install the Reset Test Function Management jumper.
- Press and hold the call button for 10 seconds. The device will be reset to factory defaults.
Factory Reset Patton SmartNode 4110 Series, 4300 Series, 4400 Series, 4520 Series, 4940, 4950, 4960, 4970, and 5200
Press the Reset button located to the left of the console port for 5 seconds until the Power LED starts blinking. The unit will restart with factory default configuration.

